Creamy Crustless Cheesecake
Oh gosh, it's been almost two weeks since I last posted! My deepest apologies! Spring has sprung and things have been busy around here, cleaning out flower beds, trimming back some plants and planting others. So that's my excuse for being absent. That, and I got sucked into The Unbreakable Kimmy Schmidt on Netflix, which I thought was hilariously fantastic. I've still been in the kitchen whipping up some tasty treats, though, and thinking what to make next to share with you.


5 large eggs, room temperature
2 cups (one pint) sour cream, room temperature
4 8-ounce packages cream cheese, room temperature
8 tablespoons (one stick) unsalted butter, room temperature
1 1/2 cups sugar
2 tablespoons cornstarch
1/2 tablespoon vanilla extract
1 teaspoon fresh lemon juice
1/2 teaspoon grated lemon zest
Butter the inside of a 10-inch springform pan and wrap a double layer of aluminum foil tightly around the outside bottom and sides, and for extra leak-protection, place wrapped pan into an oven-bag. Preheat oven to 300 degrees.
Beat the eggs and sour cream until well-blended. Set aside.
In a large bowl, beat the cream cheese and butter until smooth and creamy. Slowly add the egg-sour cream mixture and beat until smooth.
Add sugar, cornstarch, vanilla, lemon juice, and lemon zest and beat thoroughly, ensuring everything is fully incorporated and there are no lumps.
Place the prepared springform pan and oven bag into a larger pan. Pour batter into springform pan and place the whole apparatus into the oven on the center rack. Carefully add very hot (or even boiling) water to the outside pan until it reaches halfway up the springform pan.
Bake for 2 hours, 15 minutes, or until the cake is solidified and only jiggles slightly. If a browned top is desired, increase temperature by 50 degrees and bake for another 10 minutes. Remove the entire apparatus from the oven and carefully remove the cheesecake from the water bath, discarding the oven bag aluminum foil. Allow to stand at room temperature until completely cooled, approximately 4 hours. Refrigerate or freeze, covered, for several hours or overnight. For best flavor, allow to chill for a full day.
Today's recipe was a test (that is, I hadn't made it before trying it here to share with all of you), but let me tell you, it was also a wild success. One of my friends had a request for me to find and try a cheesecake recipe that she could eat. She has some dietary restrictions and needed a gluten-free cheesecake. And, even keeping in mind my mini gluten rant from the french bread recipe a couple weeks ago, most cheesecake is already mostly gluten-free: just make it without the crust!A few of my tried-and-true cheesecake recipes do have minute amounts of flour in the filling, so I ventured out into the wilds of the internet looking for a new recipe that was actually, truly, flour free. And while I personally am actually a big fan of the classic graham cracker crust, the great thing about this creamy, silky, luscious cheesecake which I have slightly modified from this one from Food for a Hungry Soul, is that while it is gluten-free for our wheat-sensitive friends, it is also smooth enough that you can very easily eat it with graham cracker, dip style, if you're feeling inventive and a little gauche. You should know by now that we don't judge here.
And it's cheesecake! You know how I feel about cream cheese. Cheesecake is one of my most favorite foods ever, and it comes in so many varieties! Plain with any number of toppings, fruit swirls, varied crusts, coffee, chocolate, cinnamon, and more! Classy but not beyond reach, I adore cheesecake. And when you say, "Oh, I made this from scratch!" people make this fantastic face where their raise their eyebrows in surprised approval, invariably impressed.
When I made this, we shared it with yet another of our friends (the friend who requested it lives in another state -- Hi, Patricia!), and I was asked, "So, have you learned the trick to cheesecake?" and I was so excited that I could answer, "Why yes! I have!" and I'll share it with you too: a water bath.
Wait! Don't leave! It's not as scary and hard as it sounds! The first time I tried a water bath on my cheesecake, I was astonished. It was much easier than I expected, and it helps solve two of the most common problems in a homemade cheesecake: texture and cracking. Since I started using a water bath for my cheesecakes I have not once had that unsightly (and slightly terrifying, if you're a Whovian) crack in time and space my cheesecake, and it keeps the inside of the cheesecake from getting dry and mealy.
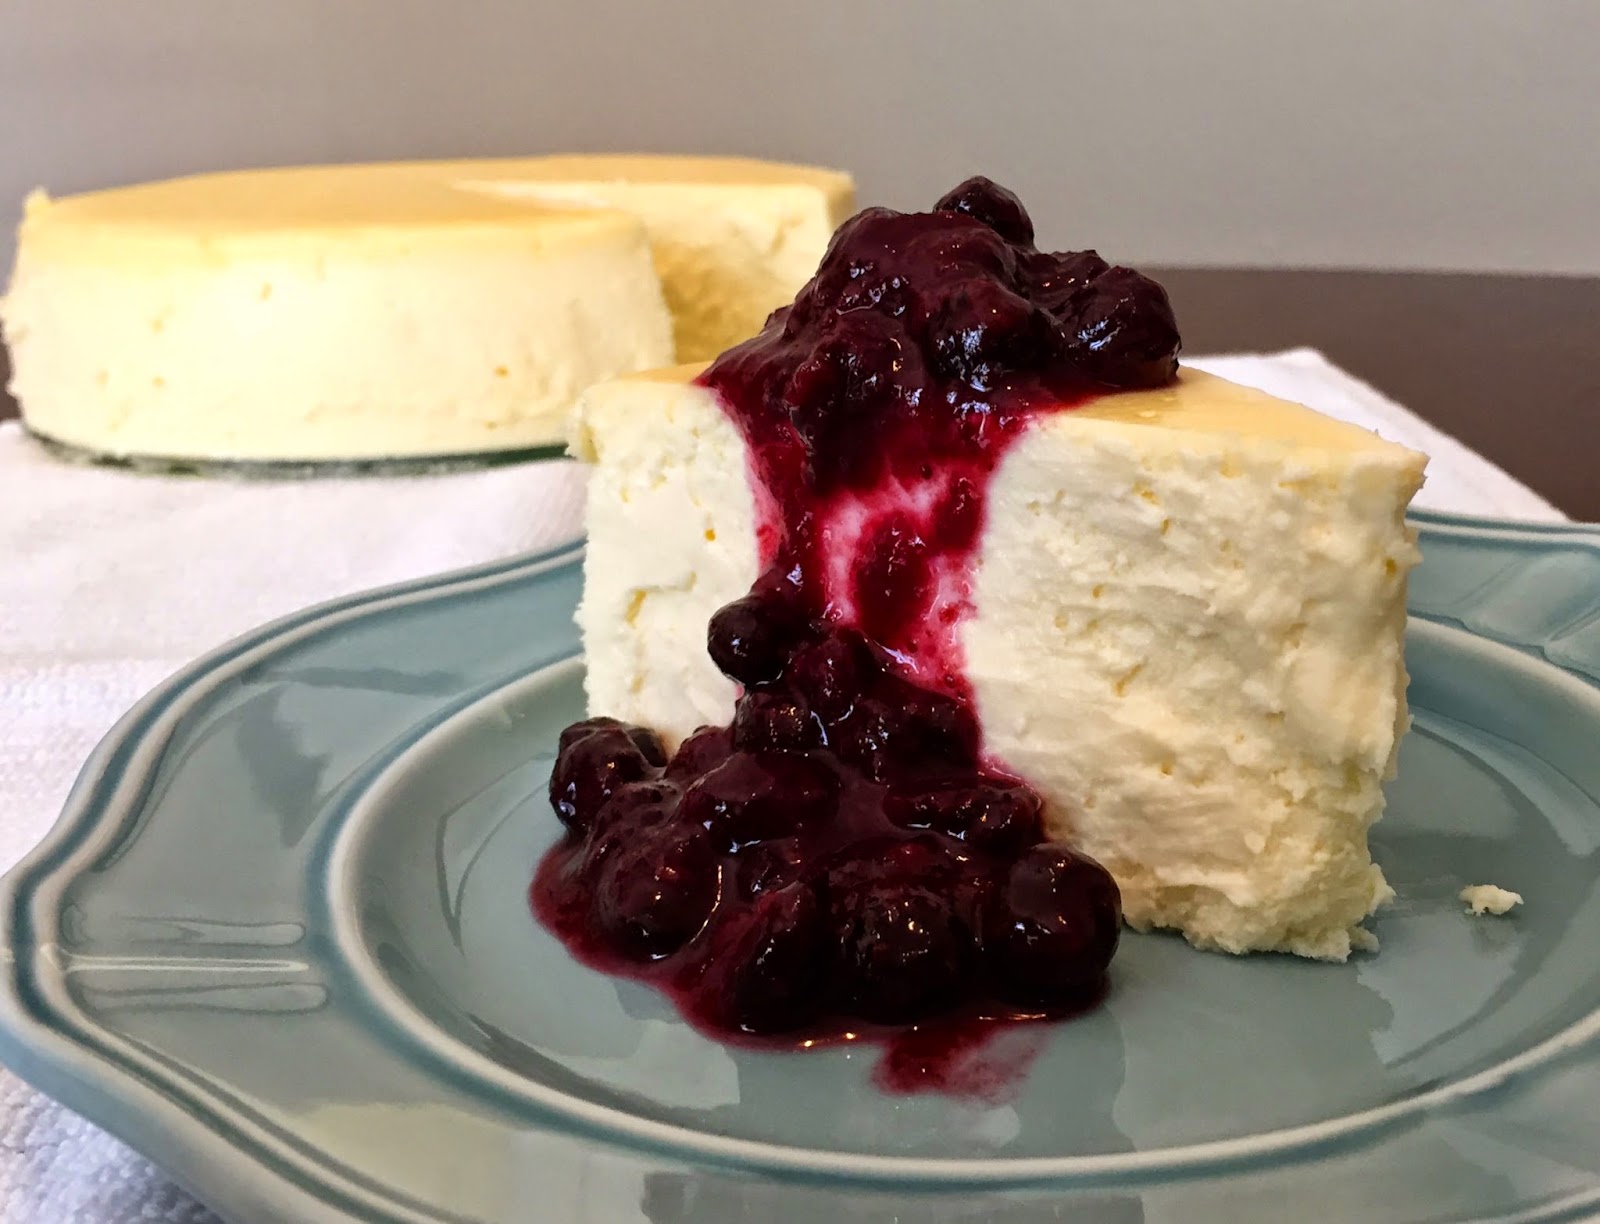
This is, however, the first cheesecake I've made in my new oven, so please pardon the lack of a lovely golden top. I could have turned the heat up a little, I'm sure, to get some lovely browning, but I was once again distracted by the puppy and ended up not being able to do that this time. Different ovens are all calibrated slightly differently, but with or without the browning, this cheesecake is awesome. And the flavor gets better after a couple days, so if you can bring yourself to wait, make it a day or two ahead of time (translation: this is great for making ahead of time for a special occasion).
I mean, look at these ingredients. You just know this is going to be good. Count 'em: four packs of cream cheese and five eggs?! That's what I'm talking about!
After assembling the Avengers ingredients, we have to take care of some very important prep work so as to keep the water bath from leaking into the springform pan and to keep the cheesecake from sticking.
Wrap it up with aluminum foil. I always need two pieces, but if you buy extra wide rolls, you might be able to get away with one, which would probably be more water-tight anyway. Also, liberally butter the inside of the pan. It's probably easiest to foil and then butter, lest you get butter everywhere from doing things the other way and then wrestling with aluminum foil. But I might be the only person who often gets into altercations with the foil. If you and the foil are buddies, do whichever order you like.
First, mix up your eggs and sour cream, and after they're all smoothly blended (and probably a little soupier than you expected) set them aside.
And then beat these bad boys together. (That is to say, the cream cheese and butter. Don't beat any actual boys, good or bad, or girls either, for that matter. Resist violence. Make cake, not war.)
But before you get into that, I'm going to take a moment to elaborate on something. You'll see in the short-form recipe below that the first four ingredients need to be at room temperature. I'm not so confident that it's a big deal for the sour cream or the eggs (I'm sure there are arguments for both camps), but I do know that it is essential that you let the cream cheese and butter come to room temperature. Especially the cream cheese. If your cream cheese isn't soft enough, it is nearly impossible to mix it up to an appropriate smoothness, and you'll end up with tiny lumps in your cheesecake. (Trust me. It happened to me on my first and very impatient attempt back in college. It's supremely disappointing). The lumps won't kill you. They won't hurt you. But they ruin the texture of the cheesecake. And also the flavor a little bit. As wonderful as cream cheese is, little clumps of it in your otherwise sweet and silky cheesecake are a bit of a downer.
After you have your cream cheese and butter thoroughly incorporated, add the egg and sour cream mixture slowly (to avoid splashing, mainly. Mix quickly if you're feeling adventurous/lucky) and continue mixing until the whole thing is, again, well mixed and smooth.
Then, in go the sugar, cornstarch, vanilla, lemon juice, and lemon zest. This recipe is fairly lemon-light because I just am not a big fan of lemon. It brings a nice tartness to the cheesecake though, so don't omit it. If you like more lemon, feel free to add more. Also, I think substituting lime or other citrus might work nicely, but I haven't tried this. (I almost did try it with lime because I couldn't find my lemon at first, but then I found the lemon and figured I should use it.) If you do try other citrus, let me know; I'm curious!
Anyway, add in this stuff and mix it up again for maybe another couple minutes or until it's all smooth.
Look at this crazy pile of stuff! As an extra precaution against water seeping into the cheesecake from the water bath, I like to use an oven bag around the foil-wrapped springform. You don't have to roll the excess down like I did, but it helps keep it out of the way. Then set the whole thing into a bigger pan and pour the batter into the springform. Put the whole apparatus into your preheated oven and pour some hot water into the outside pan until it reaches halfway up the springform. You can either use water that is as hot as your tap will go or boil some water while you're mixing everything up. If you're a regular tea-drinker like I am, turning your kettle on during the mixing process is very convenient.
I'm also going to mention that this recipe calls for a 10-inch springform pan, but I only have a 9-inch currently. The pan was definitely full, but I didn't have any spill over, and I was able to fit all the batter in the pan, so if your pan is not exactly the right size, don't worry your pretty little head over it.
And after a little over two hours, it's all puffy and glossy and beautiful! It also smells a little like what I imagine heaven smells like, with the vanilla and the cream cheese. Mmmmm.... It will settle back down a little bit, so don't fret about potential muffin-toppage either.
Remove the cheesecake from the water bath, then the oven bag (if you used one), and finally carefully take the foil off and allow the cheesecake to cool completely. After several hours, cover and place the cheesecake in the refrigerator or freezer to chill or store.
Over the last several days of eating this cheesecake with friends and family, I have found that the flavor and texture improved with each day. It was good the first day, really good the second, and decadent the third, so I think it's safe to say that it stores well in the freezer (which is where I kept it in between meals). It's rich and creamy with just the right amount of cream cheese tang all on its own but also pairs nicely with any leftover pie filling you may have.
So there you go! Scrumptious, mouth-watering cheesecake so marvelous you won't even remember it was gluten-free. (Now if only it were guilt-free!)
Creamy Crustless Cheesecake
2 cups (one pint) sour cream, room temperature
4 8-ounce packages cream cheese, room temperature
8 tablespoons (one stick) unsalted butter, room temperature
1 1/2 cups sugar
2 tablespoons cornstarch
1/2 tablespoon vanilla extract
1 teaspoon fresh lemon juice
1/2 teaspoon grated lemon zest
Butter the inside of a 10-inch springform pan and wrap a double layer of aluminum foil tightly around the outside bottom and sides, and for extra leak-protection, place wrapped pan into an oven-bag. Preheat oven to 300 degrees.
Beat the eggs and sour cream until well-blended. Set aside.
In a large bowl, beat the cream cheese and butter until smooth and creamy. Slowly add the egg-sour cream mixture and beat until smooth.
Add sugar, cornstarch, vanilla, lemon juice, and lemon zest and beat thoroughly, ensuring everything is fully incorporated and there are no lumps.
Place the prepared springform pan and oven bag into a larger pan. Pour batter into springform pan and place the whole apparatus into the oven on the center rack. Carefully add very hot (or even boiling) water to the outside pan until it reaches halfway up the springform pan.
Bake for 2 hours, 15 minutes, or until the cake is solidified and only jiggles slightly. If a browned top is desired, increase temperature by 50 degrees and bake for another 10 minutes. Remove the entire apparatus from the oven and carefully remove the cheesecake from the water bath, discarding the oven bag aluminum foil. Allow to stand at room temperature until completely cooled, approximately 4 hours. Refrigerate or freeze, covered, for several hours or overnight. For best flavor, allow to chill for a full day.


Comments
Post a Comment